The 57" Rule

The 57" rule helps take the guess work out of how high to hang anything in any space. 57" is the average person's eye level so galleries tend to hang art work at this height. It's usually spot on unless there's an odd construction reason you can't hang something at that height such as a large piece that would overlap a radiator, etc.

The main thing is to be consistent in how you hang everything in a room so that it keeps your eye flowing. It will help create cohesiveness and balance rather than making things feels scattered. 

Whether you're hanging a single piece or a group of framed art the technique is the same. 

1. measure the height of your piece (or group). Let's say a single framed piece is 18" tall.

2. divide that number in half. In this instance I would get 9". 

3. add that number to 57". This adds half the amount of frame height to the average eye level so that your piece will be centered at eye level. 57 + 9 = 66. 

4. flip your piece over to see where the hook, wire, etc. is and measure how far down it is from the top of the frame. Make sure to pull your wire up as high as it will go to simulate how it will hang before measuring. Let's say the distance from the top of my frame to the hook is 2". 

5. subtract that amount (2" in my case) from the number in the third step (66"). 66 - 2 =64. 

6. measure that high from the floor on your wall and mark. This is where you will want to drill your hole or attach your 3m hook, etc (64" high in my case). Once hung, your piece will be centered at eye level.

When you're working with a group of art, the concept is basically the same. Instead of measuring a single framed piece you'll measure from the top edge of the highest piece to the bottom edge of the lowest piece. In my case it was about 39" from top to bottom. I divided that number in half to get 19.5" and then added it to 57" to get 76.5". This is where it's different.


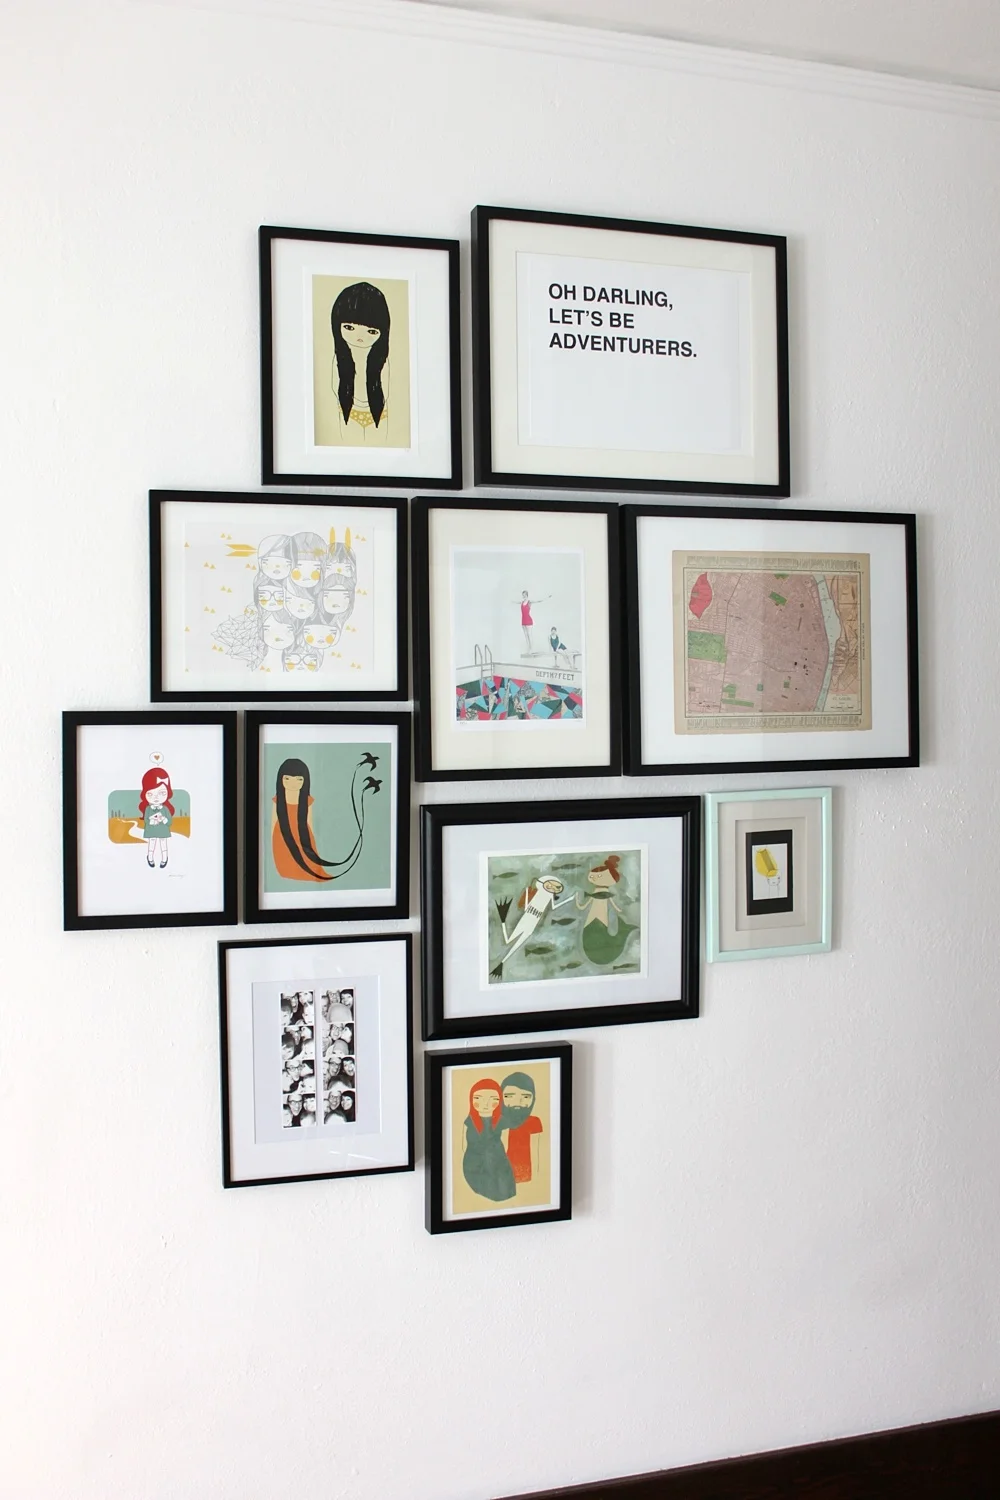
Tips on arranging your gallery wall.

These tips and images were found on the amazing site www.momtastic.com by Janette Crawford at homepolish

1. Lay it out.

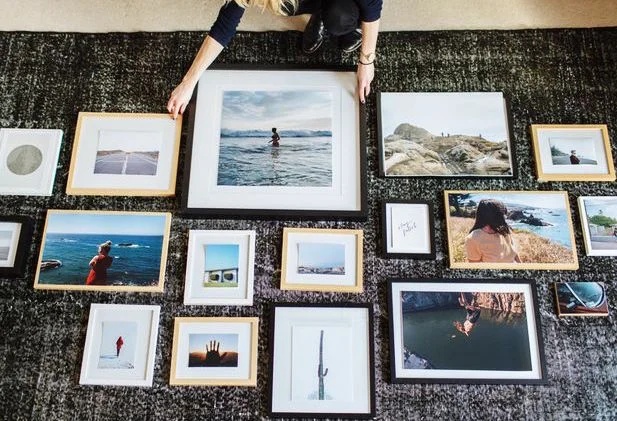
Lay out the pieces of your gallery wall on the floor. Start with a large centerpiece and build out. Use inspiration images from Step 1 to help. If you’re having a hard time deciding on a composition, try this: When you have something you like, snap a picture on your phone. Then make another arrangement. Do this a few times, and then flip through the snapshots. This “editorial view” can help you decide which you like best.
 

2. Mock it up

Next, to be sure that your composition looks good on the wall and that the height of it is right(see 57" rule above), mock it up on the wall with paper. Trace each frame onto a piece of kraft or tissue paper, trim to size, and tape to the wall in your desired order. Ask yourself, is it grouped around nearby furniture appropriately? Is it a comfortable height? Does it fill the space appropriately?  Note that this step is optional, but it helps alleviate error (i.e., unwanted nail holes)!


3. Hammer and Hang

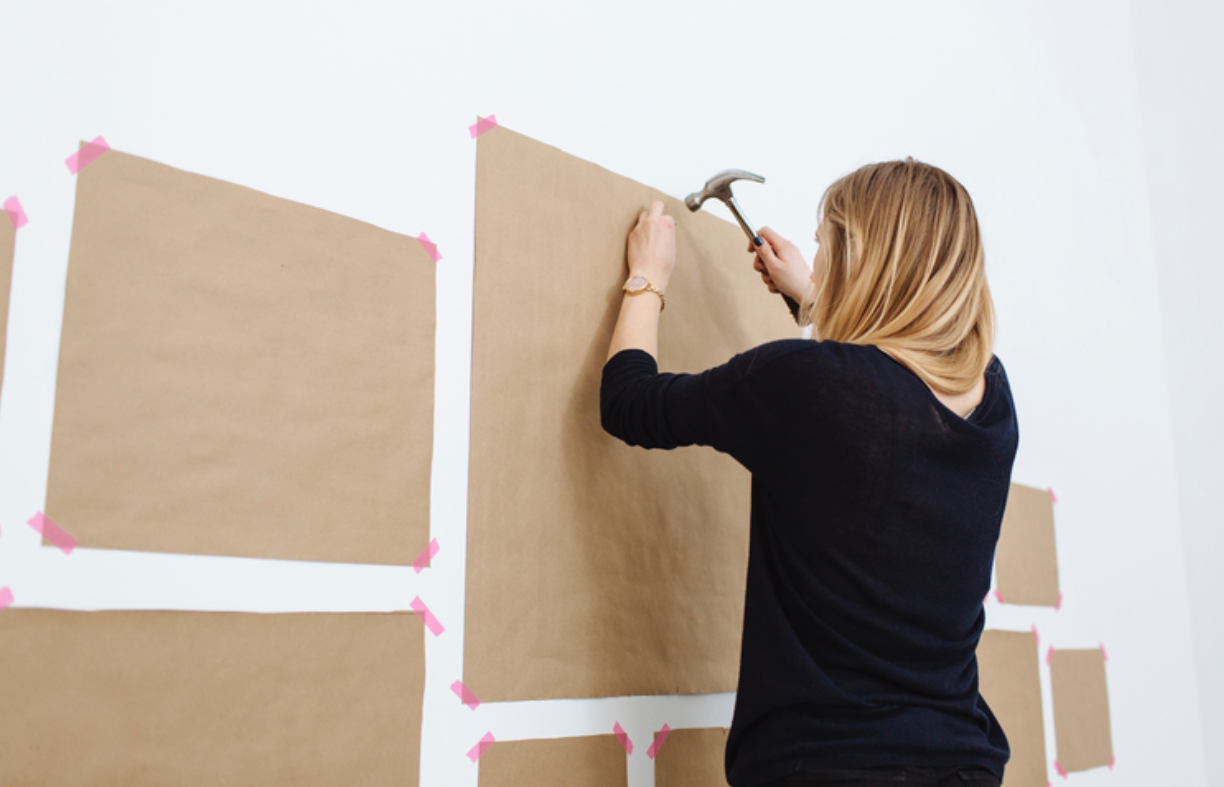
One perk of using paper mock-ups is making nail placement easy. You can mark each paper with the spot where the frame’s nail should be placed, and when the paper is on the wall, hammer it directly into the mark on the paper, tearing it away after. Then comes our favorite part—hanging those glorious frames on that glorious wall. 

4. Enjoy

10 Epic Treehouses

Be warned the following images may lead to trading in your home for a tree house. 

1. Inhabit Treehouse

Though currently just a concept, designer Antony Gibbon's Inhabit Treehouse is finished with a cedar cladding that ages along with the structure, so that it will blend into its surroundings over time. You enter the treehouse — how else? — through a classic trapdoor in the center.


2. The Bird's Nest

The Bird's Nest is a circular treehouse at the Swedish Treehotel that, true to its name, mimics a birds nest. (Though the inside is thoroughly posh.)


3. Cocoon Tree

For the more adventurous treehouse-builder, these Cocoon Trees are spherical waterproof pods that are rigged up onto trees with ropes and nets.


4. Hapuku Lodge Upper Branch Tree House

This New Zealand hotel offers the option of staying in treehouses. Wouldn't you rather sleep in a place like this? It's like an apartment, but better and above a Manuka grove. Hapuku Lodge & Tree Houses


5. The Mirrorcube

This Mirrorcube a literal cube in the sky - it also basically makes you invisible.


6. Ramshackle Treehouse

This treehouse looks maybe a little bit unsafe, but also like a cross between a Tim Burton creation and the Weasley family's abode. So basically awesome.


7. Huntsville Botanical Garden Treehouse

treehouse-huntsville.gif

Located in Alabama, Huntsville Botanical Garden has exhibited treehouses as part of its Tremendous Treehouses exhibit in 2010. This one in particular looks beautifully geometric.


8. The Cabin

The Treehotel's Cabin is just like a capsule in the sky. The view looks pretty great.


9. Free Spirit Spheres

Free Spirit Spheres look almost fictional in the best way possible. These spherical treehouses are accessed by a spiral staircase and suspension bridge. 


10. The UFO

Live out any alien abduction fantasies, because this treehouse is the real deal. The inside of The UFO is even decorated with space paraphernalia.


11. My Personal Favorite

This one is pretty close to my dream treehouse. I image it must be a short hike away from a warm, clean ocean with a lovely surf break. Can't seem to find the location of this beauty. Hoping our paths will cross.

Industrial Pipe Shelving

Pipe shelves are great if you want to add an industrial-chic touch to your home. They are very versatile and can be used in any room. There are tons of uses for pipe shelves and lots of places where you can mount them and install them.

In a contemporary bedroom you can install pipe shelves and create a simple and open décor. Paint them or keep the natural look to match your room.

I bet this is not what yo pictured when you imagined kitchen island shelves. It’s actually a very interesting idea: adding shelves on top of the island for extra storage. The pipes go all the way up to the ceiling and keep the island secure.

Another great place where shelves are particularly useful is the home office. A nice idea is to build a shelving unit to also incorporate the desk or work station.

The space underneath the stairs usually remains empty and there’s no point in wasting all this space when some shelves would fit perfectly there. Make the most of your home. A system of simple pipe shelves would look great here and you can even turn the space into a work area.

An open closet is a great way of saving space in the bedroom. Pipe shelves are a very nice choice: easy to install, versatile and great for a rustic-industrial type of décor.

Similarly, pipe shelves would make a nice addition to a alk-in closet. You get tons of storage space for bags, shoes and accessories. Use reclaimed wood if you wish to highlight the industrial or shabby chic look.

There are lots of storage requirements in the kitchen and shelves are great for storing spices or for displaying accent features. Install them above the backsplash and secure them to the ceiling.

Save floor space by installing suspended shelves. Secure the pipes to the ceiling and get a nice corner storage unit for your kitchen. Great for tiny spaces such as this area near the window where regular cabinets would be a tight fit.

Here’s another great use for pipe shelves: build a wall extension. You can get extra storage and display shelves or even create partitions in an open floor plan.

A more complex shelving system could be used in a home library. For example, you could even cover an entire wall in shelves and have ladders to access the top ones.

Leftover Wood?

If you haven't already, check out Urban Outfitter's DIY blog on their website. Here is a great DIY with scrap wood done by the Design Build Senior Manager. Photos by Michael Muller  

Things you’ll need:
⁃Wood (Todd used a mix of scrap and some reclaimed that he had laying around the shop) 
⁃Saw 
⁃Drill
⁃2 1/8” Forstner bit
⁃Clamps
⁃Glue
⁃Painter's tape
⁃Ruler
⁃Sandpaper
⁃Finishing oil or a spray polyurethane 
⁃Small potted plants: succulents or cacti are best
⁃Potting soil 
⁃Little rocks or river stones 

This planter is made from layers of wood (Todd used some reclaimed teak mixed with pieces of scrap Baltic birch plywood, but any kind will work). First step is deciding the shape of your planter — we went with a simple triangle. Using your ruler, draw out your shape on one of the pieces of wood and make sure you will have enough room to drill the hole inside where your plant will go. Todd used a miter saw to slice everything down, but a handsaw will work too.  

Best practice is to cut your first piece and then trace the other pieces from that. This will help keep all your pieces the same size. Once you have all your pieces cut, stack them all up together to make sure everything lines up evenly. If you're happy with it, it's time to glue! It's good to have a wet rag handy for wiping up excess glue as you press the layers together, since the glue tends to ooze out. If it doesn’t, add a little more glue so you get a good bond.

Once you have glue between all the layers, use the painter's tape to help align all the pieces while you're clamping it, because the layers tend to slide around as you tighten the clamps. When you have it all clamped let the glue dry for at least 30 minutes in the clamps. Once you remove the clamps let the glue dry overnight. 
 

After the glue has set up it's time to sand! Todd used a bench top belt sander, which makes everything way speedier, but you can also just take a piece of sandpaper, spray mount it to a flat surface, and then slide your planter back and forth on it until it's smooth.

After it's all smooth, use your square to mark the center for drilling your hole. This planter is about 4 1/2" tall and Todd drilled the hole about 3 1/2” deep. You can make it as large or as small as you want, but it should be at least 3” deep. (Use one of your clamps to hold the planter while you're drilling so you can use both hands on the drill.)

After you drill the hole, do one more quick little sand just to make sure everything is nice and smooth and that there are no splinters.

Time to finish it! Todd used tung oil to finish it because it brings out the color and grain in the wood, but you can also use any kind of polyurethane. Spray polyurethane is easy and dries fast. Once your finish is all dry, you're ready to plant!
 

Put about a 1/2” of your little pebbles in the bottom so there's some space for water to sit away from the roots of the plant. After that, add your soil and your plant. Finally, pack the soil down lightly and add water. Now enjoy your new planter!

Upcycled Bottle Chandelier

Use upcycled wine bottles to create inexpensive lighting for a wine cellar, kitchen, bar or dining room.

TOOLS

  • utility knife
  • glass-cutting tool
  • drill with 1” paddle bit

MATERIALS

  • wine bottles in assorted colors and heights
  • damp cloth
  • lamp sockets and wire

Clean the Bottles

Collect an assortment of discarded wine bottles ranging in different heights and colors. Remove labels using utility knife and damp cloth. Once most residue is gone, rinse bottles in sink with running water. TIP: Some labels are more difficult to remove than others. Consider soaking them in water until the paper and glue soften.

Score Bottles

Place each wine bottle upright on a flat, even surface. Use glass cutting tool to score the perimeter of the bottle, approximately 1/2” up from the bottom. Once completely scored, knock bottom of bottle loose using hammer. The hammer should create a clean break, causing the bottom to drop off in one piece. NOTE: The bottoms of the bottles are removed so that the sockets and light bulbs can be placed inside.

Add Wire to Sockets

Cut lamp wire with wire cutters into 16” strands which should account for the proper span needed between the socket and the junction box which each socket will be screwed into. Attach each end of the wire to the corresponding positive or negative screw located inside each socket using screwdriver. Repeat this step for all wine bottles.

Ensure Proper Socket Fitting

Insert light bulb into socket and ensure a level fit by placing sockets up inside of each of the bottles. Repeat this step for all wine bottles.

Cut Wood Plank to Size

Depending on the desired length of your wine bottle chandelier, cut the plank of 2” by 8' pine to size using reciprocating saw or circular saw. NOTE: The remaining portion of wood will be used to create a ceiling canopy which should be at least 24” long. If your wine bottle chandelier is intended to be 6 feet long or smaller, the remaining pine will be sufficient enough to make the canopy.

Stain the Plank

Use damp cloth to add two even coats of self-sealing wood stain to 2” x 10’ pine plank.

Drill Holes for the Bottles

Using drill and 1” paddle bit, add holes directly through the pine plank spaced approximately 8 inches apart.

Test Fit

With the bottle-holding plank placed along a flat, level surface, place wine bottles upside down into drilled holes to ensure a tight, secure fit.

Add and Conceal Junction Box

Attach shallow square plastic junction box along the center of the top of bottle-holding plank using drill. Create a fascia to hide the junction box from view by making a four-sided frame using 1” by 2” pine fascia trim, miter saw and wood screws. Place fascia around junction box and test all socket wires for proper length. NOTE: To electrify the chandelier, lamp wires from all wine bottles will connect together in the junction box, then be transferred to the ceiling through one central grounded wire permanently affixed to the main junction box of the ceiling.

Create the Ceiling Canopy Piece

A ceiling canopy will be attached directly to the surface of the ceiling and be used to suspend chain which will hold the bottle-holding plank. Create the ceiling canopy from the remaining 2” x 8’ pine, first by staining it with two coats of the self-sealing wood stain. Next, use drill to add two central holes into the canopy spaced wide enough for securing the canopy tightly to the ceiling-mounted junction box. Add a third hole roughly 1 inch from the other two, wide enough to feed lamp wire up through the wood plank and into the ceiling-mounted junction box.

Add Hanging Hardware

Attach six hook eyes to the wood plank for securing each strand of chain. When all hook eyes are in position, do a dry run by attaching the ceiling canopy to the ceiling with screws up through the holes and into the junction box. Attach chain to hook eyes, then cut chain to proper length using bolt cutters.

Suspend Bottle-Holding Plank

Suspend bottle-holding plank from ceiling canopy with chain. Use caulk gun to add silicone along surface of drilled holes. Next, insert wine bottles up into holes until securely and snugly in place, then insert sockets up through the wine bottles and through drilled holes of plank.

Feed Wires to Junction Box

Feed each socket’s wires up through the holes and into the central junction box. Lastly, with the help of a friend, remove screws from canopy, then insert grounded wire from the bottle-holding plank’s junction box up through the small, drilled hole of the canopy and into the junction box of the ceiling. Re-attach canopy, then turn on light switch to test chandelier.

Reclaimed Wood Mirrors

Up-cycling is an environmentally aware design process that helps you reduce your carbon footprint. An example of upcycling (one that I really love) is mirrors framed with reclaimed wood. This type of wood often comes from old deconstructed buildings; once retrieved, it’s repurposed into home furniture and accessories. An advantage of reclaimed wood is that its age and imperfections give it lots of character.

A mirror framed with reclaimed wood is an unexpected decorative piece with real rustic charm.


It’s a statement piece that can also be the focal point in your room, like this floor model.

Maybe you don’t want to have such a huge statement piece in your room. If so, then make it smaller and mount it on the wall. It still will draw your eyes over to it!

By painting your reclaimed wood frame, you can give it an entirely different look and make it easier to blend it in with your existing home decor.

Recycled Pallet Projects: Vertical Gardens

People have come up with some awesome ways to recycle and reuse wooden shipping pallets and it’s pretty darn inspiring.   I put together a collection of some of my favorite recycled pallet vertical garden projects below that I thought you would enjoy.

*A note on using pallets.  Pallets are typically marked with either MB which means they’ve been chemically treated or HT which means they have been heat treated.  Some pallets are also pressure treated with preservatives.  You should try to avoid using MB marked and pressure treated pallets for interior projects and gardening projects.  Try to avoid those nasty chemicals if you can.

Have any of you re-purposed a wooden pallet?  Share and comment below!

DIY Ladder Tutorial

Want a unique piece of decor that will add tons of character to a room? Learn how to build your own ladder with this simple, step-by-step tutorial don by Love Grows Wild!

DIY-Blanket-Ladder-1.jpg


1)  I picked up 2 – 6 foot 1 x 4 boards from the hardware store and one 6 foot 3/4″ dowel rod. I sanded down all edges of the boards to give them a worn, rustic look.

2) I cut the dowel rod into 4 – 18″ pieces.

3) I laid all the pieces out to find the spacing I wanted for the ladder rungs and marked where each rung would go on the 1 x 4’s. I ended up spacing mine 14 1/2 inches apart.

4) Using a 3/4″ paddle bit, I drilled a shallow round in the 1 x 4’s  for each of my rungs. *You only need to make a small groove for the dowel rod to set in.

5) I drilled long screws into one of the boards, securing the dowel rods in place.

6) Then I lined up the second board and screwed the other side of each dowel rod in place.

I wiped the ladder down really well and stained it with my favorite dark walnut stain. After it was dry, I applied a coat of paste finishing wax

5 RECLAIMED WOOD IDEAS FOR YOUR HOME

1. KITCHEN ISLAND: We can’t get over this island. We’re especially in love with the built-in wine holder on the right

26-600x400.jpg

2. WOOD WALL: We love how the reclaimed wood wall in this Melbourne, Australia coffee shop is 3D. Magic!

3. RECLAIMED WOOD SLIDING DOOR: We love sliding barn doors over here at True Form Builders. In particular, we love the clean finish of this a-door-able piece.

4. STAIRCASE: These raisers are completely modern and masculine.

5. ACCENT WALL: Add another layer of space, dimension, and interest to your room.

Up-cycled Shipping Container Homes

Believe it or not, there was a time when shipping container homes seemed like nothing more than a novel idea. While many saw the sustainability benefits from building a home with recycled shipping containers, most thought they looked much too ugly to call home. Well thankfully there are talented designers out there, with a much better knack for creativity and design than us. It’s these designers, architects, and outside of the box thinkers that have taken the trend of shipping container homes to new heights over the years. What was once just a bizarre thought has now become the ultimate dream for many of us.

These days there are a handful of companies waiting to make your dream become a reality, some right here in the United States. These steel shipping container homes (often referred to as storage container houses) are completely manufactured in a factory-controlled environment, so there is no need to worry about reliability or quality control. All you have to do is supply the land, and the money of course. Next comes the design process. What exactly are you looking for? Would you like a single container transformed into a small studio or office space? Or how about a collection of shipping containers fused together in order to create a much more spacious residence?